| Figure 2.1.: | Startup Window (click to enlarge) |
In the following we explain the main points of interaction with the user interface of the RISC ProgramExplorer. We assume that the system is appropriately , that the current working directory is the subdirectory examples-ProgramExplorer-CVC3 of the installation directory with write permission enabled (respectively that the current working directory is a writable copy of that directory), and that the task directory has been restored from file PETASKS.tgz (see the README file in the directory). After typing on the command line
ProgramExplorer &
first a splash screen with a copyright message appears. After a few seconds, a window pops up that displays the actual startup screen shown below:
This window initially displays the “Analysis” view of the RISC ProgramExplorer, which is one of the three main views:
One may switch to another view by clicking on the corresponding tab on the top-right of the window (provided the view is currently applicable).
In the following, we only describe the “Analysis” view; the other views are explained in Chapter 4. As already stated, the main purpose of this view is to edit a program or theory file; when saving the file, it is automatically type-checked and semantically processed. As a consequence, in the tab “Symbols”, the resulting semantic symbols (e.g. program methods) are displayed; in the tab “All Tasks”, the generated (e.g. verification) tasks are shown. Source code, symbols, and tasks are interlinked; by double-clicking a symbol/task, the corresponding line in the source code is highlighted; by double-clicking on the defining occurrence of a symbol name in the source code, the corresponding symbol is high lighted; by double-clicking any other occurrence is definition is printed.
The view has three menus at the top:
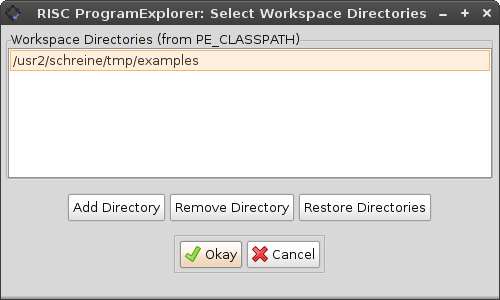
The menu entry “Workspace...” displays the window shown below:
This window displays those directories that together represent the root of the package hierarchy for the RISC ProgramExplorer. The default is the list of those directories set in the respectively, if the variable is not set, the current working directory. The buttons “Add Directory” and “Remove Directory” modify the list, the button “Restore Directories” restores the original setting. The button “Okay” activates the current selection, the button “Cancel” discards it.
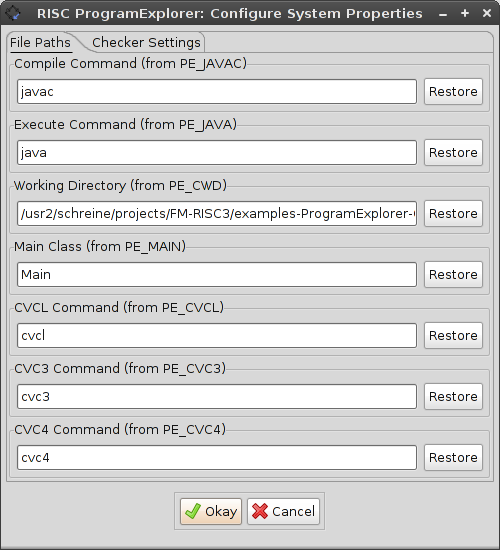
The entry “Properties...” displays the window shown below:
This window allows to configure various properties related to the installation of the software: in the first tab “File Paths”, one can set the path to the Java compiler, the path to the Java application launcher, the path of the working directory (used e.g. for creating new files), the path for the main class of the program (the class containing method main), and the paths to the various versions of the Cooperating Validity Checker (CVC) that the RISC ProgramExplorer may use. The values of these variables can be configured by various .
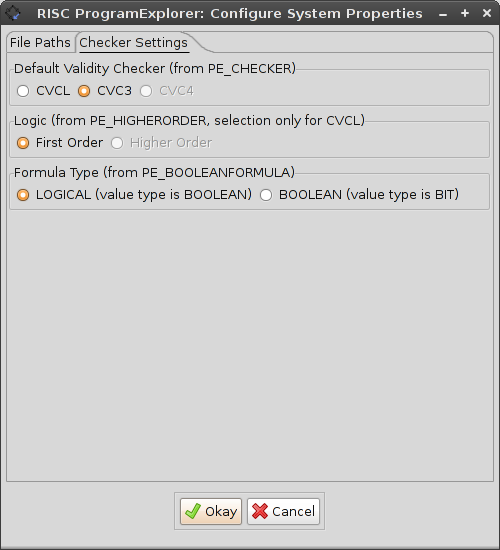
In the second tab “Checker Settings”, one may control which version of CVC to use (currently CVCL or CVC3, support for the forthcoming CVC4 is pending), and depending on the choice, some other settings. If the older CVCL is used, one may choose whether the underlying logic is higher order (functions and predicates are plain values) or first order (functions and predicates cannot be passed as values to other functions or predicates, also no quantification over functions and values is allowed); for the newer CVC3 (the default), only the selection “first order” is possible. If the logic is first order, then one may furthermore select, whether the result type of predicates is type LOGICAL (the type BOOLEAN with constants TRUE and FALSE then stands for plain values, this is the default) or type BOOLEAN (the type BIT with constants BITTRUE and BITFALSE then stands for plain values).
The button “Okay” confirms all modifications, the button “Cancel” discards them.
The menu entry “Quit” terminates the program.
Below the menu, a row of buttons is displayed as shown below:


The main area of the view is split into four areas (whose borders may be dragged by the mouse pointer). The central area (which is initially empty) is the “editing” area where program and specification files may be displayed and edited. The other three areas are:
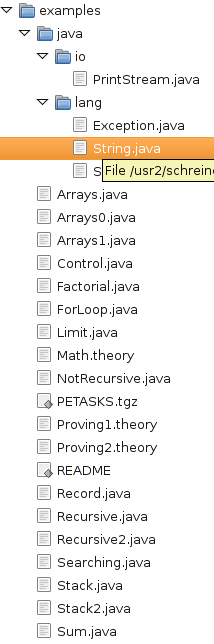
In this area, the tabs “Files” and “Symbols” display the directory respectively symbol structure of the workspace as shown below:
By moving the mouse pointer over a directory/file, a yellow “tip” window pops up that displays the path of the corresponding directory/file respectively information on the corresponding symbol.
Double-clicking on a file opens the corresponding file in the central editing area. Right-clicking on a directory opens a pop-up menu with an option “Refresh” to refresh the display of the directory content and an option “Delete” to delete the directory (after a confirmation). Right-clicking on a file opens a pop-up menu with an option “Open” to open the file in the editing area and an option “Delete” to delete the file (after a confirmation).
Double-clicking on a symbol (e.g. a class symbol or a theory symbol) also opens the corresponding source file (a .java file or a .theory file) in the editor but also immediately processes it; the success of the operation is displayed in the “Console” area. There are the following kinds of symbols:


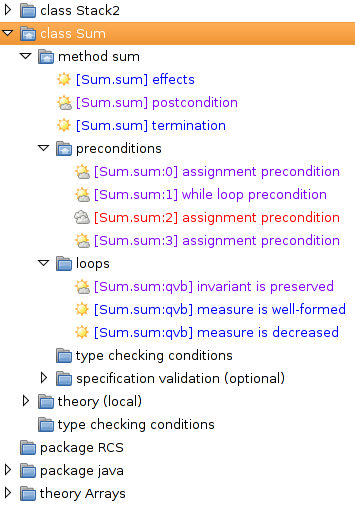
In this area, the tabs “All Tasks” and “Open Tasks” display the tree of all tasks organized in task folders respectively the list of all open tasks as shown below:
The status of the task is indicated by in icon and the color of the description:


By default all task folders are open and display their contents (an exception are those folders that are marked as “optional”). By right-clicking one of the tabs “All Tasks” or “Open Tasks” a menu pops up whose entry “Hide Completed Tasks” closes all folders that do not contain open tasks; the entry “Show All Tasks” opens all folders again. The entry “Execute All Tasks” attempts all open tasks that have automatic solution strategies associated.
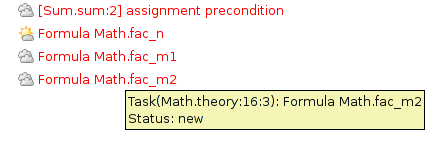
By moving the mouse pointer over a task, a yellow “tip” window pops up that displays information on the task such as the kind of task and its status. By double-clicking on the task, the position in the source code of the program or theory is displayed that triggered the creation of the task.
The solution of presumably simple tasks (such as type checking) is immediately attempted by an automatic strategy when the task is created; if this fails, the user may attempt an interactive proof to solve the task. Other presumably complex tasks (such as the proof of the correctness of loop invariants) are not automatically attempted; their solution must be explicitly triggered by the user.
By right-clicking on the task a pop-up menu shows various options depending on the kind of task: “Execute Task” attempts to solve the task e.g. by an automatic proof or, if that fails, by a computer-assisted interactive proof; “Print Task” prints information on the task (the content of the “tip” window) in the “Console” area. “Print State Proving Problem” prints a translation of the task into a proving problem in an extended logic that involves reasoning about program states. “Print Classical Proving Problem” prints a translation of the problem into a classical predicate logic proving problem. “Print Status Evidence (Proof)” shows an associated proof; “Reset Task” resets the task into the “new” state (and deletes any associated proof).
By right-clicking on a task folder, a pop-up menu shows up whose option “Execute Task” attempts to solve all tasks that have an automatic solution strategy associated (interactive proofs have to be individually triggered as shown above).