This chapter presents an interactive sample session with the Parallel Analyzer View. The session demonstrates basic features of ProMP and illustrates aspects of parallelization and of the MIPSpro FORTRAN 77 compiler.
The sample session illustrates how to display code and basic loop information, as well as how to examine specific loops and apply directives and assertions.
The topics are introduced in this chapter by going through the process of starting the Parallel Analyzer View and stepping through the loops and routines in the sample code. The chapter is most useful if you perform the operations as they are described.
For more details about the Parallel Analyzer View interface, see Chapter 6, “Parallel Analyzer View Reference”.
To use the sample sessions, note the following:
/usr/demos/ProMP is the demonstration directory
ProMP.sw.demos must be installed
The sample session discussed in this chapter uses the following source files in the directory /usr/demos/ProMP/omp_tutorial:
omp_demo.f_orig
omp_dirs.f_orig
omp_reshape.f_orig
omp_dist.f_orig
The source files contain many DO loops, each of which illustrates an aspect of the parallelization process.
The /usr/demos/ProMP/omp_tutorial directory also includes a Makefile to compile the source files.
The following topics are covered in this tutorial:
Prepare for the session by opening a shell window and entering the following:
% cd /usr/demos/ProMP/omp_tutorial % make |
These commands create the following files:
omp_demo.f: a copy of the demonstration program created by combining the *.f_orig files, which you can view with the Parallel Analyzer View (or any text editor), and print
omp_demo.m: a transformed source file, which you can view with the Parallel Analyzer View, and print
omp_demo.l: a listing file
omp_demo.anl: an analysis file used by the Parallel Analyzer View
After you have the appropriate files from the compiler, start the session by entering the cvpav(1) command. which opens the main window of the Parallel Analyzer View loaded with the sample file data (see Figure 2-1):
% cvpav -f omp_demo.f |
If at any time during the tutorial you should want to restart from the beginning, do the following:
Quit the Parallel Analyzer View by choosing Admin -> Exit from the Parallel Analyzer View menu bar.
Clean up the tutorial directory by entering the following command:
% make clean
This removes all of the generated files; you can begin again by using the make command.
The Parallel Analyzer View main window contains the following components, as shown in Figure 2-1:
Main menu bar, which includes the following menus:
Admin
Views
Fileset
Update
Configuration
Operations
Help
List of loops and control structures, which consists of the following:
Status information
Performance experiment information
Loop list
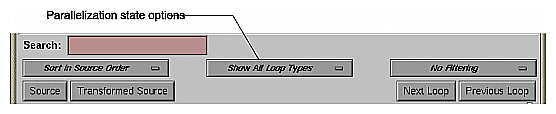
Loop display controls, which are the following:
Search editable text field
Sort option button (Sort in Source Order)
Show loop types option button (Show All Loop Types)
Filtering option button (No Filtering)
Source and Transformed Source control buttons
Next Loop and Previous Loop navigation buttons
Loop information display
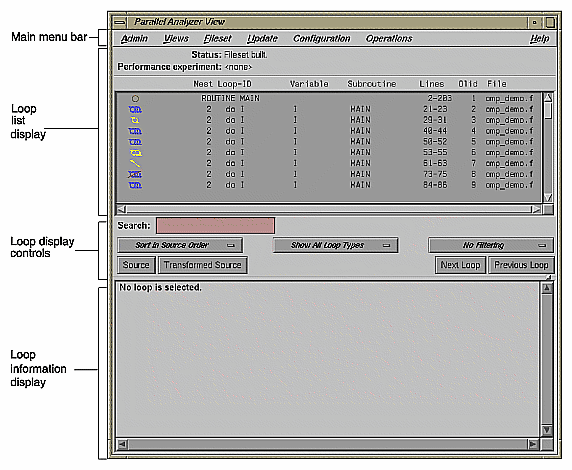
The loop list display summarizes a program's structure and provides access to source code. Each line in the loop list contains an icon and a sequence of information fields about loops and routines in the program.
Each loop list entry contains the following fields:
The subroutine field contains the name of the subroutine in which the loop is located.
The lines field displays the lines in the source code in which the loop is located.
The Olid is the original loop ID, an internal identifier for the loop created by the compiler.
The file field names the file in which the loop is located.
The icon at the start of each line summarizes briefly the following information:
If the line refers to a subroutine or function.
The parallelization status of the loop.
OpenMP control structures.
To understand the meaning of the various icons, choose Admin > Icon Legend... .
To resize the loop list display and provide more room in the main window for loop information, use the adjustment button. The adjustment button is a small square below the Previous Loop button and just above the vertical scroll bar on the right side of the loop information display. In many of the following figures, the loop list is resized from its original configuration.
The loop list Search field allows you to find occurrences of any character in the loop list. You can search for subroutine names, a phrase (such as parallel or region), or Olid numbers. (See Figure 2-2.)
The search is not case sensitive; simply key in the string. To find subsequent occurrences of the same string, press the Enter key.
This section describes the loop display control option buttons. They allow you to sort and filter the loop list, and so focus your attention on particular pieces of your code. As shown in Figure 2-1, the buttons are located in the main window, below the loop list display. Figure 2-2, shows all of the loop display controls.

You can sort the loop list either in the order of the source code, or by performance cost (if you are running the WorkShop performance analyzer). You usually control sorting with the sort option button, the left-most button below the Search field.
When loops are sorted in source order, the loop-ID is indented according to the nesting level of the loop. For the demonstration program, only the last several loops are nested, so you have to scroll down to see indented loop-IDs. For example, scroll down the loop list until you find a loop whose nest value, as shown in the loop list, is greater than 2.
When loops are sorted by performance cost, using Sort by Perf.Cost option button, the list is not indented. The sorting option is grayed out in the example because the performance analyzer is not currently running.
You may want to look at only some of the loops in a large program. The loop list can be filtered according to parallelization status and loop origin. The filter parameters are controlled by the two option buttons to the right of the sort option button.
Procedure 2-1. Filtering the Loop List by Parallelization State
Filtering according to parallelization state allows you to focus, for example, on loops that were not automatically parallelized by the compiler but that might still run concurrently if you add appropriate directives.
Filtering is controlled by the Show Loop Types option button centered below the loop list; the default setting is Show All Loop Types, as shown in Figure 2-3.
You can select according to the following states of loop parallelization and processing (which are displayed when you click the show loop types option button):
Show All Loop Types, the default.
Show Unparallelizable Loops displays loops that are running serially because they could not be parallelized.
Show Parallelized Loops displays loops that were parallelized.
Show Serial Loops displays loops that are best run serially.
Show PCF Directives displays loops containing PCF directives.
Show OMP Directives displays loops containing OpenMP directives.
Show Modified Loops displays loops for which modifications have been requested.
The second, third, and fourth categories correspond to parallelization icons in the Icon Legend... window. Making modifications to loops is described in “Making Changes”.
To see the effects of these options, choose them in turn by clicking on the option button and selecting each option. If you choose the Show Modified Loops option, a message appears that no loops meet the filter criterion, because you have not made any modifications.
Procedure 2-2. Filtering the Loop List by Loop Origin
Another way to filter is to choose loops that come from a single file or a single subroutine or function using these steps:
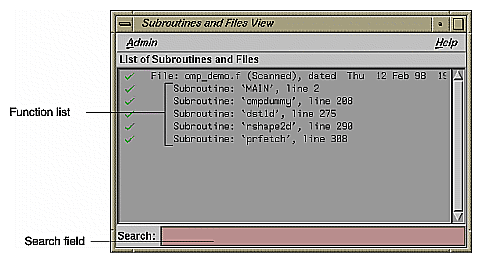
Open a list of subroutines (or functions) and files from which to choose by selecting the Views > Subroutines and Files View option.
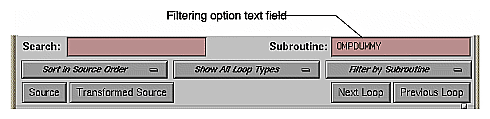
Choose the filter criterion from the filtering option button. This is the right-most option button in the Parallel Analyzer View window. The filter criterion is No Filtering by default. You can filter according to source file or subroutine.
To place filtering information in the editable text field that appears above the option button (Figure 2-4), you can do one of the following:
Procedure 2-3. Sorting by Subroutine
The following procedure describes filtering the loop list by subroutine.
Close the Subroutines and Files View by choosing its Admin > Close option.
Open the subroutines and files view by choosing Views > Subroutines and Files View. The window opens and lists the subroutines and files in the file set. (See Figure 2-5.)
Choose Filter by Subroutine from the filtering option button.
Double-click the line for the subroutine OMPDUMMY() in the list of the Subroutines and Files View window. The name appears in the Subroutine filtering option text field (Figure 2-4), and the loop list is recreated according to the filter criteria.
You can also try choosing Filter by File with the filtering option button, but this is not very useful for this single-file example.
When you are done, display all of the loops in the sample source file again by choosing No Filtering with the option button.
This section describes how to examine original and transformed source, and the details of loops in the loop list.
Procedure 2-4. Viewing Original Source
Click the Source button on the lower left corner of the loop display controls to bring up the Source View window, shown in Figure 2-6.
Colored brackets mark the location of each loop in the file; you can click on a bracket to choose a loop in the loop list.
Note that the bracket colors vary as you scroll up and down the list. These colors correspond to different parallelization icons and indicate the parallelization status of each loop. The bracket colors indicate which loops are parallelized, which are unparallelizable, and which are left serial. The exact correspondence between colors and icons depends on the color settings of your monitor.
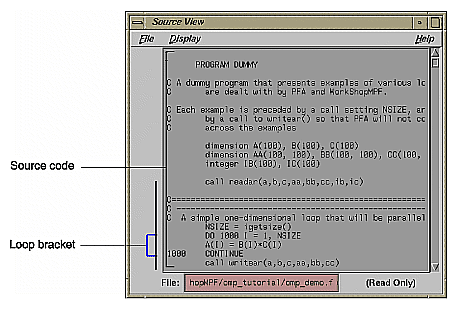
You can search the source listing by using one of the following:
The File menu in the Source View.
The keyboard shortcut Ctrl+s when the cursor is in the Source View.
You can locate a loop in the source code, click on its colored bracket in the Source View, and see more information about the loop in the loop information display.
Leave the Source View window open, because subsequent steps in this tutorial refer to the window.
| : This window may also be used by the WorkShop Debugger and Performance Analyzer, so it remains open after you close the Parallel Analyzer View. |
Procedure 2-5. Viewing Transformed Source
The compiler transforms loops for optimization and parallelization. The results of these transformations are not available to you directly, but they are mimicked in a file that you can examine. Each loop may be rewritten into one or more transformed loops, it may be combined with others, or it may be optimized away.
Click the Transformed Source button in the loop display controls (see Figure 2-2). A window labeled Parallel Analyzer View - Transformed Source opens, as shown in Figure 2-7.
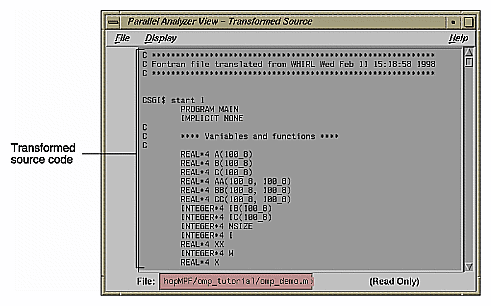
Scroll through the Transformed Source window, and notice that it too has brackets that mark loops; the color correspondence is the same as for the Source View.
The bracketing color selection for the transformed source does not always distinguish between serial loops and unparallelizable loops; some unparallelizable loops may have the bracket color for a serial loop.
Leave the Transformed Source window open; subsequent steps in this tutorial refer to the window. You should have three windows open:
Parallel Analyzer View
Source View
Transformed Source
Procedure 2-6. Navigating the Loop List
You can locate a loop in the main window by one of the following methods:
Scrolling through the loop list using one of these:
Scroll bar.
Page Up and Page Down keys (the cursor must be over the loop list).
Next Loop and Previous Loop buttons.
Searching for the Olid number using the Search field.
Procedure 2-7. Selecting a Loop for Analysis
To get more information about a loop, select it by one of the following methods:
Double-click the line of text in the loop list (but not the icon).
Click the loop bracket in either of the source viewing windows.
Selecting a loop has a number of effects on the different windows in the Parallel Analyzer View. Not all of the windows in the figure are open at this point in the tutorial; you can open them from the Views menu.
In the Parallel Analyzer View, information about the selected loop appears in the previously empty loop information display.
In the Source View, the original source code of the loop appears and is highlighted.
In the Transformed Source, the first of the loops into which the original loop was transformed appears and is highlighted in the window. A bright vertical bar also appears next to each transformed loop that came from the original loop.
The Transformed Loops View shows information about the loop after parallelization.
The PFA Analysis Parameters View (o32 code only) shows parameter values for the selected loop.
Try scrolling through the loop list and double-clicking various loops, and scrolling through the source displays and clicking the loop brackets to select loops. Notice that when you select a loop, a check mark appears to the left of the icon in the loop list, indicating that you have looked at it.
Scroll to the top of the loop list in the main view and double-click the line for the first loop, Olid 1.
Close the Transformed Loops View and the PFA Analysis Parameters View, if you have opened them.
Procedure 2-8. Using the Loop Information Display
The loop information display occupies the portion of the main view below the loop display controls. Initially, the display shows only No loop is selected. After a loop or subroutine is selected, the display contains detailed information and controls for requesting changes to your code.
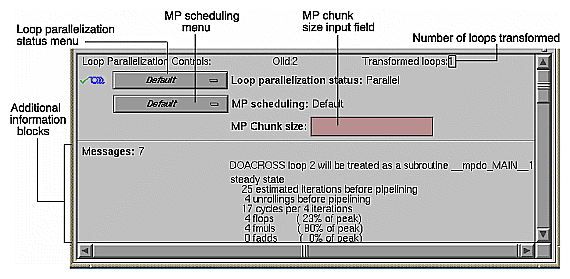
The first line in the loop information display shows the Loop Parallelization Controls. The following are displayed when no performance information is available:
On the first line is the loop Olid and the number of transformed loops derived from the selected loop.
The next three lines display two option buttons and an editable text field.
The top button controls the loop's parallelization status (see “Loop Parallelization Status Option Button” in Chapter 6).
The second button controls the loop's multiprocessor scheduling. It is shown for all loops but is applicable to parallel loops only; for more information see “MP Scheduling Option Button: Directives for All Loops” in Chapter 6.
The MP Chunk size editable text field lets you select the scheduling chunk size. For more information on the MP Chunk size, see “MP Chunk Size Field” in Chapter 6.
When the Parallel Analyzer View is run with a performance experiment, by invoking SpeedShop, an additional block (see Figure 5-4) appears above the parallelization controls. It gives performance information about the loop.
Up to five blocks of additional information may appear in the loop information display below the first separator line. These blocks list, when appropriate, the following information:
Obstacles to parallelization
Assertions made
Directives applied
Messages
Questions the compiler asked (o32 only)
Some of these lines may be accompanied by highlight buttons, represented by small light bulb icons. When you click one of these buttons, it highlights the relevant part of the code in the Source View and the Transformed Source windows.
The loop information display shows directives that apply to an entire subroutine when you select the line with the subroutine's name. If you select Olid 1, you see that there are no global directives in the main program. However, if you find subroutine dst1d(), you will see a directive that applies to it (see “Distributed Arrays: C$SGI DISTRIBUTE ”).
The loop information display shows loop-specific directives when you select a loop. The lines for assertions and directives may have option buttons accompanying them that provide capabilities, such as, deleting a directive.
To see detailed information about the transformed loops derived from a particular loop, pull down the Views > Transformed Loops View option.
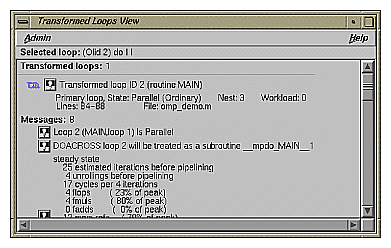
The Transformed Loops View contains information about the loops into which the currently selected original loop was transformed. Each transformed loop has a block of information associated with it; the blocks are separated by horizontal lines.
The first line in each block contains:
A parallelization status icon.
A highlight button. It highlights the transformed loop in the Transformed Source window and the original loop in the Source View.
The identification number of the transformed loop.
The next two lines describe the transformed loop. The first provides the following information:
Whether it is a primary loop or secondary loop. A primary look is transformed from the selected original loop. A secondary loop is transformed from a different original loop, but it incorporates some code from the selected original loop.
Parallelization state.
Whether it is an ordinary loop or interchanged loop (see the Glossary).
Nesting level.
Workload.
The second line displays the location of the loop in the transformed source.
Any messages generated by the compiler are below the description lines. To the left of the message lines are highlight buttons, and left-clicking them highlights in the Source View the part of the original source that relates to the message. Often it is the first line of the original loop that is highlighted, since the message refers to the entire loop.
You can also select specific transformed loops. When you click a highlight button in the Transformed Loop View, the highlighting of the original source typically changes color, although for loop Olid 1 the highlighted lines do not (see Figure 2-10). For loops with more extensive transformations, the set of highlighted lines is different when you select from the Transformed Loops View (for example, see “Fused Loops”).
Transformed loops can also be selected by clicking the corresponding loop brackets in the Transformed Source window.
You can either leave the Transformed Loops View open or close it by selecting its Admin > Close menu item. When looking at subsequent loops, you might find it useful to see the information in the Transformed Loops View.
Now that you are familiar with the basic features in the Parallel Analyzer View user interface, you can start examining, analyzing, and modifying loops.
The loops in this section are the simplest kinds of Fortran loops:
Two other sections discuss more complicated loops:
| : The loops in the next sections are referred to by their Olid. Changes to the Parallel Analyzer View, such as, the implementation of updated OpenMP standards, may cause the Olid you see on your system to differ from that in the tutorial. Example code, which you can find in the Source View, is included in the tutorial to clarify the discussion. |
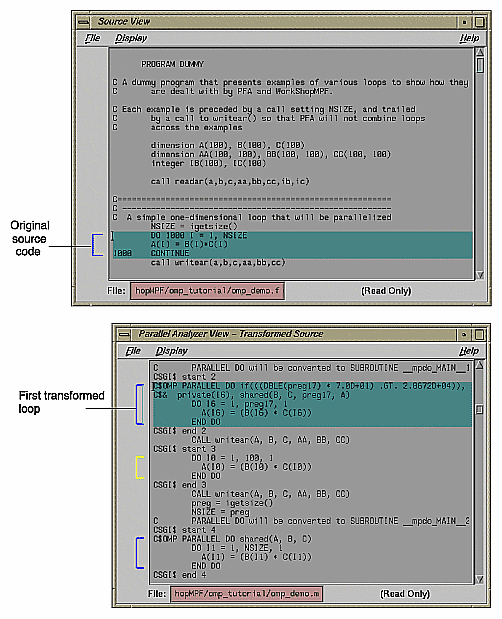
Scroll to the top of the list of loops and select loop Olid 2. This loop is a simple loop: computations in each iteration are independent of each other. It was transformed by the compiler to run concurrently. Notice in the Transformed Source window the directives added by the compiler.
Move to the next loop by clicking the Next Loop button.
Olid 2 is a simple loop with too little content to justify running it in parallel. The compiler determined that the overhead of parallelizing would exceed the benefits; the original loop and the transformed loop are identical.
Move to the next loop by clicking the Next Loop button.
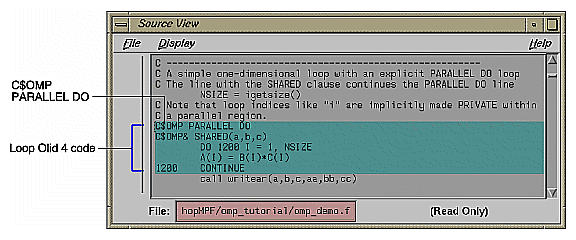
Loop Olid 3 is parallelized because it contains an explicit C$OMP PARALLEL DO directive in the source, as is shown in the loop information display (Figure 2-11). The compiler passes the directive through to the transformed source.
The loop parallelization status option button is set to C$OMP PARALLEL DO..., and it is shown with a highlight button. Clicking the highlight button brings up both the Source View (Figure 2-12), if it is not already opened, and the Parallelization Control View, which shows more information about the parallelization directive.
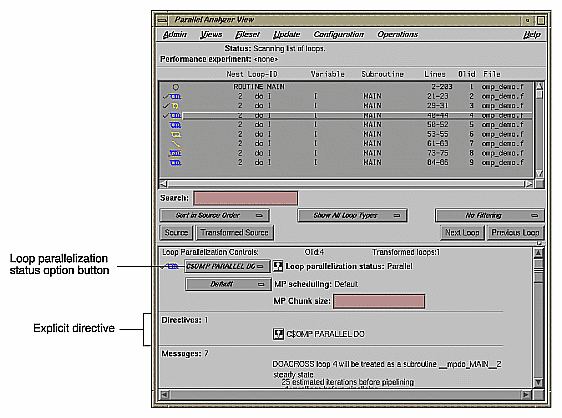
If you clicked on the highlight button, close the Parallelization Control View. (Using the Parallelization Control View is discussed in “Adding C$OMP PARALLEL DO Directives and Clauses”.)
Close the Source View and move to the next loop by clicking the Next Loop button.
Loops Olid 5 and Olid 6 are simple parallel loops that have similar structures. The compiler combines these loops to decrease overhead. Note that loop Olid 6 is described as fused in the loop information display and in the Transformed Loops View; it is incorporated into the parallelized loop Olid 5. If you look at the Transformed Source window and select Olid 5 and Olid 6, the identical lines of code are highlighted for each loop.
        DO 1300 I = 1, NSIZE
        A(I) = B(I) + C(I)
1300    CONTINUE
        DO 1350 I = 1, NSIZE
        AA(I,NSIZE) = B(I) + C(I)
1350 CONTINUE |
Move to the next loop by clicking Next Loop twice.
Loop Olid 7 is an example of a loop that the compiler can eliminate entirely. The compiler determines that the body is independent of the rest of the loop. It moves the body outside of the loop, and eliminates the loop. The transformed source is not scrolled and highlighted when you select Olid 7 because there is no transformed loop derived from the original loop.
Move to the next loop, Olid 8, by clicking the Next Loop button. This loop is discussed in “Unparallelizable Carried Data Dependence”.
There are a number of reasons why a loop may not be parallelized. The loops in the following parts of this section illustrate some of these reasons, along with variants that allow parallelization:
These loops are a few specific examples of the obstacles to parallelization recognized by the compiler. The final part of this section, “Obstacles to Parallelization Messages”, contains two tables that list all of the messages generated by the compiler that concern obstacles to parallelization.
Carried data dependence typically arises when recurrence of a variable occurs in a loop. Depending on the nature of the recurrence, parallelizing the loop may be impossible. The following loops illustrate four kinds of data dependence:
Loop Olid 8 is a loop that cannot be parallelized because of a data dependence; one element of an array is used to set another in a recurrence.
Example 2-5. Unparallelizable Carried Data Dependence
        DO 2000 I = 1, NSIZE-1
        A(I) = A(I+1)
2000 CONTINUE |
If the loop were nontrivial (if NSIZE were greater than two) and if the loop were run in parallel, iterations might execute out of order. For example, iteration 4, which sets A(4) to A(5), might occur after iteration 5, which resets the value of A(5); the computation would be unpredictable.
The loop information display lists the obstacle to parallelization. Click the highlight button that accompanies it. Two kinds of highlighting occur in the Source View:
The relevant line that has the dependence
The uses of the variable that obstruct parallelization; only the uses of the variable within the loop are highlighted
Move to the next loop by clicking Next Loop.
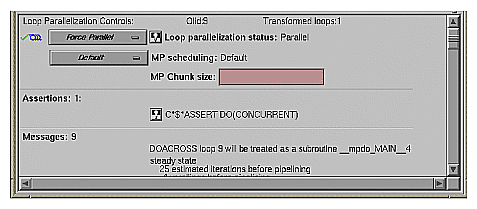
Loop Olid 9 has a structure similar to loop Olid 8. Despite the similarity however, Olid 9 may be parallelized.
Example 2-6. Parallelizable Carried Data Dependence
C*$*ASSERT DO (CONCURRENT)
        DO 2100 I = 1, NSIZE
        A(I) = A(I+M)
2100 CONTINUE |
Note that the array indices differ by offset M. If M is equal to NSIZE and the array is twice NSIZE, the code is actually copying the upper half of the array into the lower half, a process that can be run in parallel. The compiler cannot recognize this from the source, but the code has the assertion C*$* ASSERT DO (CONCURRENT) so the loop is parallelized.
Click the highlight button to show the assertion in the Source View.
Move to the next loop by clicking the Next Loop button.
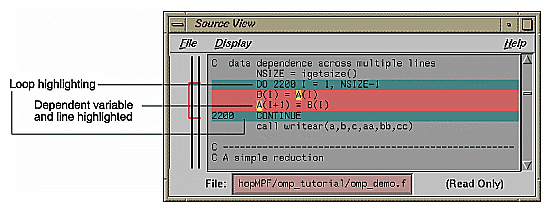
Data dependence can involve more than one line of a program. In loop Olid 10, a dependence similar to that in Olid 9 occurs, but the variable is set and used on different lines.
Example 2-7. Multi-line Data Dependence
        DO 2200 I = 1, NSIZE-1
        B(I) = A(I)
        A(I+1) = B(I)
2200 CONTINUE |
Click the highlight button on the obstacle line.
In the Source View, highlighting shows the dependency variable on the two lines (see the figure that follows). Of course, real programs, typically, have far more complex dependences than this.
Move to the next loop by clicking Next Loop.
Loop Olid 11 shows a data dependence that is called a reduction: the variable responsible for the data dependence is being accumulated or reduced in some fashion. A reduction can be a summation, a multiplication, or a minimum or maximum determination. For a summation, as shown in this loop, the code could accumulate partial sums in each processor and then add the partial sums at the end.
However, because floating-point arithmetic is inexact, the order of addition might give different answers because of roundoff error. This does not imply that the serial execution answer is correct and the parallel execution answer is incorrect; they are equally valid within the limits of roundoff error. With the -O3 optimization level, the compiler assumes it is OK to introduce roundoff error, and it parallelizes the loop. If you do not want a loop parallelized because of the difference caused by roundoff error, compile with the -OPT:roundoff=0 or 1 option.
Move to the next loop by clicking Next Loop.
Loop Olid 12 has an input/output (I/O) operation in it. It cannot be parallelized because the output would appear in a different order depending on the scheduling of the individual CPUs.
Example 2-9. Input/Output Operation
        DO 2500 I = 1, NSIZE
        print 2599, I, A(I)
2599        format("Element A(",I2,") = ",f10.2)
2500 CONTINUE |
Click the button indicating the obstacle, and note the highlighting of the print statement in the Source View.
Move to the next loop by clicking Next Loop.
Loop Olid 13 has an unstructured control flow: the flow is not controlled by nested if statements. Typically, this problem arises when goto statements are used; if you can get the branching behavior you need by using nested if statements, the compiler can better optimize your program.
Example 2-10. Unstructured Control Flow
        DO 2600 I = 1, NSIZE
        A(I) = B(I)*C(I)
        IF (A(I) .EQ. 0) GO TO 2650
2600 CONTINUE |
Because the goto statement is essential to the program's behavior, the compiler cannot determine how many iterations will take place before exiting the loop. If the compiler parallelized the loop, one thread might execute iterations past the point where another has determined to exit.
Click the highlight button in the Obstacles to Parallelization information block in the loop information display, next to the unstructured control flow message. Note that the line with the exit from the loop is highlighted in the Source View.
Move to the next loop by clicking Next Loop.
Unless you make an assertion, a loop with a subroutine call cannot be parallelized; the compiler cannot determine whether a call has side effects (such as creating data dependencies.)
Loop Olid 14 is unparallelizable because there is a call to a subroutine, RTC(), and there is no explicit assertion to parallelize.
Example 2-11. Unparallelizable Loop With Subroutine Call
        DO 2700 I = 1, NSIZE
        A(I) = B(I) + RTC()
2700 CONTINUE |
Click the highlight button on the obstacle line; note the highlighting of the line containing the call and the highlighting of the subroutine name.
Move to the next loop by clicking the Next Loop button.
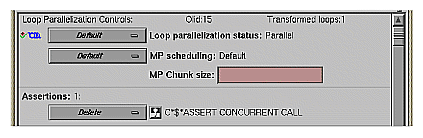
Although loop Olid 15 has a subroutine call in it similar to that in Olid 14, it can be parallelized because of the assertion that the call has no side effects that will prevent concurrent processing.
Example 2-12. Parallelizable Loop With Subroutine Call
C*$*ASSERT CONCURRENT CALL
        DO 2800 I = 1, NSIZE
        A(I) = B(I) + FOO()
2800 CONTINUE |
Click the highlight button on the assertion line in the loop information display to highlight the line in the Source View containing the assertion.
Move to the next loop by clicking Next Loop.
If you specify array index values by values in another array (referred to as a permutation vector), the compiler cannot determine if the values in the permutation vector are distinct. If the values are distinct, loop iterations do not depend on each other and the loop can be parallelized; if they are not, the loop cannot be parallelized. Thus, without an assertion, a loop with a permutation vector is not parallelized.
Loop Olid 16 has a permutation vector, IC(I), and cannot be parallelized.
Example 2-13. Unparallelizable Loop With Permutation Vector
        DO 3200 I = 1, NSIZE-1
        A(IC(I)) = A(IC(I)) + DELTA
3200 CONTINUE |
Move to the next loop by clicking the Next Loop button.
An assertion, C*$* ASSERT PERMUTATION, that the index array, IB(I) is indeed a permutation vector has been added before loop Olid 17. Therefore, the loop is parallelized.
Example 2-14. Parallelizable Loop With Permutation Vector
C*$*ASSERT PERMUTATION(ib)
        DO 3300 I = 1, NSIZE
        A(IB(I)) = A(IB(I)) + DELTA
3300 CONTINUE |
Move to the next loop, Olid 18, by clicking Next Loop. This loop is discussed in “Doubly Nested Loop”.
All of the messages that can be found in an Obstacles to Parallelization information block are found in the following lists. Because they include specific loop and line information, messages that appear in the loop information display differ slightly from those in the tables.
| Loop doesn't have parallelization directive | |
Auto-parallelization is off. Loop doesn't contain a parallelization directive. | |
| Loop is preferred serial; insufficient work to justify parallelization | |
Could have been parallelized, but preferred serial. The compiler determined there was not enough work in the loop to make parallelization worthwhile. | |
| Loop is preferred serial; parallelizing inner loop is more efficient | |
Could have been parallelized, but preferred serial. The compiler determined that making an inner loop parallel would lead to faster execution. | |
| Loop has unstructured control flow | |
Might be parallelizable. There is a goto statement or other unstructured control flow in the loop. | |
| Loop was created by peeling the last iteration of a parallel loop | |
Might be parallelizable. Loop was created by peeling off the final iteration of another loop to make that loop go parallel. Compiler did not try to parallelize this peeled, last iteration. | |
| User directive specifies serial execution for loop | |
Might be parallelizable. Loop has a directive that it should not be parallelized. | |
| Loop can not be parallelized; tiled for reshaped array instead | |
Might be parallelizable. The loop has been tiled because it has reshaped arrays, or is inside a loop with reshaped arrays. The compiler does not parallelize such loops. | |
| Loop is nested inside a parallel loop | |
Might be parallelizable. Loop is inside a parallel loop. Therefore, the compiler does not consider it to be a candidate for parallelization. | |
| Loop is the serial version of parallel loop | |
Might be parallelizable. The loop is part of the serial version of a parallelized loop. This may occur when a loop is in a routine called from a parallelized loop; the called loop is effectively nested in a parallel loop, so the compiler does not parallelize it. | |
| Tough upper bounds | |
Could not have gone parallel. Loop could not be put in standard form, and therefore could not be analyzed for parallelization. Standard form is: for (i = lb; i <= ub; i++) | |
| Indirect ref | |
Could not have gone parallel. Loop contains some complex memory access that is too difficult to analyze. | |
The following table lists the Obstacles to Parallelization block messages that deal with dependence issues (such as those involving scalars, arrays, missing information, and finalization).
| Loop has carried dependence on scalar variable | ||
Problem with scalars. The loop has a carried dependence on a scalar variable. | ||
| Loop scalar variable is aliased precluding auto parallelization | ||
Problem with scalars. A scalar variable is aliased with another variable, e.g. a statement equivalencing a scalar and an array. | ||
| Loop can not determine last value for variable | ||
Problem with scalars. A variable is used out of the loop, and the compiler could not determine a unique last value. | ||
| Loop carried dependence on array | ||
Problem with arrays. The loop carries an array dependence from one array member to another array member. | ||
| Call inhibits auto parallelization | ||
Problem with missing dependence information. A call in the loop has no dependence information, and is assumed to create a data dependence. | ||
| Input-output statement | ||
Problem with missing dependence information. The compiler does not parallelize loops with input or output statements. | ||
| Insufficient information in array | ||
Problem with missing dependence information. Array has no dependence information. | ||
| Insufficient information in reference | ||
Problem with missing dependence information. Unnamed reference has no dependence information. | ||
| Loop must finalize value of scalar before it can go parallel | ||
Problem with finalization. Value of scalar must be determined to parallelize loop. | ||
| Loop must finalize value of array before it can go parallel | ||
Problem with finalization. Value of array must be determined to parallelize loop. | ||
| Scalar may not be assigned in final iteration | ||
Problem with finalization. The compiler needed to finalize the value of a scalar to parallelize the loop, but it couldn't because the value is not always assigned in the last iteration of the loop. The following code is an example. The variable s poses a problem; the if statement makes it unclear whether the variable is set in the last iteration of the loop.
| ||
| Array may not be assigned in final iteration | ||
Problem with finalization. The compiler needed to finalize the value of an array to parallelize the loop, but it couldn't because the values are not always assigned in the last iteration of the loop. The following is an example. The variable b poses a problem when the compiler tries to parallelize the i loop; it is not set in the last iteration.
| ||
The loops in this section illustrate more complicated situations, involving nested and interchanged loops.
Loop Olid 18 is the outer loop of a pair of loops and it runs in parallel. The inner loop runs in serial, because the compiler knows that one parallel loop should not be nested inside another. However, you can force parallelization in this context by inserting a C$OMP PARALLEL DO directive with the C$SGI&NEST clause. For example, see “Distributed and Reshaped Arrays: C$SGI DISTRIBUTE_RESHAPE”.
Example 2-15. Doubly Nested Loop
        DO 4000   I = 1,NSIZE
          DO 4010   J = 1,NSIZE
            AA(J,I) = BB(J, I)
4010      CONTINUE
4000 CONTINUE |
Click Next Loop to move to the inner loop, Olid 19.
Notice that when you select the inner loop that the end-of-loop continue statement is not highlighted. This happens for all interior loops and is a compiler error that disrupts line numbering in the Parallel Analyzer View. Be careful if you use the Parallel Analyzer View to insert a directive for an interior loop; check that the directive is properly placed in your source code.
Click Next Loop again to select the outer loop of the next nested pair.
The outer loop, Olid 20, is shown in the loop information display as a serial loop inside a parallel loop. The original interior loop is labelled as parallel, indicating the order of the loops has been interchanged. This happens because the compiler recognized that the two loops can be interchanged, and that the CPU cache is likely to be more efficiently used if the loops are run in the interchanged order. Explanatory messages appear in the loop information display.
Example 2-16. Interchanged Doubly Nested Loop
        DO 4100   I = 1,NSIZE
          DO 4110   J = 1,NSIZE
            AA(I,J) = BB(I, J)
4110      CONTINUE
4100 CONTINUE |
Move to the inner loop, Olid 21, by clicking the Next Loop button.
Click Next Loop once again to move to the following triply-nested loop.
The order of Olid 22 and Olid 23 has been interchanged. As with the previous nested loops, the compiler recognizes that cache misses are less likely.
Example 2-17. Triply Nested Loop With Interchange
        DO 5000   I = 1,NSIZE
          DO 5010   J = 1,NSIZE
            CC(I,J) = 0.
            DO 5020   K = 1,NSIZE
              CC(I,J) = CC(I,J) + AA(I,K)* BB(K,J)
5020        CONTINUE
5010      CONTINUE
5000 CONTINUE |
Double-click on Olid 22, Olid 23, and Olid 24 in the loop list and note that the loop information display shows that Olid 22 and Olid 24 are serial loops inside a parallel loop, Olid 23.
Because the innermost serial loop, Olid 24, depends without recurrence on the indices of Olid 22 and Olid 23, iterations of loop Olid 22 can run concurrently. The compiler does not recognize this possibility. This brings us to the subject of the next section, the use of the Parallel Analyzer View tools to modify the source.
Return to Olid 22, if necessary, by using the Previous Loop button.
So far, the discussion has focused on ways to view the source and parallelization effects. This section discusses controls that can change the source code by adding directives or assertions, allowing a subsequent pass of the compiler to do a better job of parallelizing your code.
You control most of the directives and some of the assertions available from the Parallel Analyzer View with the Operations menu.
You control most of the assertions and the more complex directives, C$OMP DO and C$OMP PARALLEL DO, with the loop parallelization status option button. (See Figure 2-15.)
There are two steps to modifying source files:
Make changes using the Parallel Analyzer View controls, discussed in “Making Changes”
Modify the source and rebuild the program and its analysis files, discussed in “Applying Requested Changes”.
You make changes by one of the following actions:
Add or delete assertions and directives using the Operations menu or the Loop Parallelization Controls.
Add clauses to or modify directives using the Parallelization Control View.
Modify the PFA analysis parameters in the PFA Analysis Parameters View (o32 only.)
You can request changes in any order; there are no dependencies implied by the order of requests. The following changes are discussed in this section:
Loop Olid 22, shown in Figure 2-15, is a serial loop nested inside a parallel loop. It is not parallelized, but its iterations could run concurrently.
To add a C$OMP PARALLEL DO directive to Olid 22, do the following:
Make sure loop Olid 22 is selected.
Click on the loop parallelization status option button (Figure 2-15) and choose C$OMP PARALLEL DO... to parallelize Olid 22.
This sequence requests a change in the source code, and opens the Parallelization Control View (Figure 2-15). You can now look at variables in the loop and attach clauses to the directive, if needed.
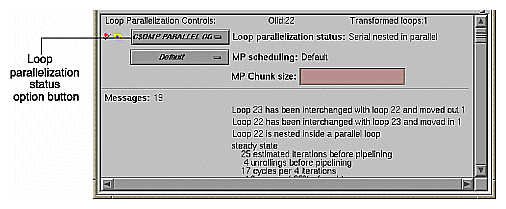
Figure 2-16, shows information presented in the Parallelization Control View for a C$OMP PARALLEL DO directive. (For the C$OMP DO directive, see “Parallelization Control View” in Chapter 6):
The selected loop.
Condition for parallelization editable text field.
MP scheduling option button.
PRIVATE, SHARED, DEFAULT, FIRSTPRIVATE, LASTPRIVATE, COPYIN, REDUCTION, AFFINITY, NEST, and ONTO clause windows.
A list of all the variables in the loop, each with an icon indicating whether the variable was read, written, or both; these icons are introduced in “Loop List Icons”.
In the list of variables, each variable has a highlight button to indicate in the Source View its use within the loop; click some of the buttons to see the variables highlighted in the source view. After each variable's name, there is a descriptor of its storage class: Automatic, Common, or Reference. (See “Variable List Storage Labeling” in Chapter 6.)
You can add clauses to the directive by placing appropriate parameters in the text fields, or using the options menus.

Notice that in the loop list, there is now a red plus sign next to this loop, indicating that a change has been requested (see Figure 2-17).
Close the Parallelization Control View by using its Admin -> Close option.
To add a new assertion to a loop, do the following:
Find loop Olid 14 (introduced in Example 2-11) either by scrolling the loop list or by using the search feature of the loop list. (Go to the Search field and enter 14.)
Double-click the highlighted line in the loop list to select the loop.
Pull down Operations -> Add Assertion -> C*$*ASSERT CONCURRENT CALL to request a new assertion.
This adds an assertion, C*$* ASSERT CONCURRENT CALL, that says it is safe to parallelize the loop despite the call to RTC(), which the compiler thought might be an obstacle to parallelization. The loop information display shows the new assertion, along with an Insert option button to indicate the state of the assertion when you modify the code.
The procedure for adding directives is similar. To start, choose Operations -> Add Directive.
Move to the next loop, Olid 15 (shown in Example 2-12).
To delete an assertion, follow these steps:
Figure 2-18 shows the state of the assertion in the information display. A similar procedure is used to delete directives.
From this point, the next non-optional step in the tutorial is at the beginning of “Updating the Source File”.
Now you have requested a set of changes. Using the controls in the Update menu, you can update the file. These are the main actions that the Parallel Analyzer View performs during file modification:
Generates a sed script to accomplish the following steps.
Rename the original file to have the suffix .old.
Run sed on that file to produce a new version of the file, in this case omp_demo.f.
Depending on how you set the two checkboxes in the Update menu, the Parallel Analyzer View then does one of the following:
Spawns the WorkShop Build Manager to rerun the compiler on the new version of the file.
Opens a gdiff window or an editor, allowing you to examine changes and further modify the source before running the compiler. When you quit gdiff, the editing window opens if you have set the checkboxes for both windows. When you quit these tools, the Parallel Analyzer View spawns the WorkShop Build Manager.
After the build, the Parallel Analyzer View rescans the files and loads the modified code for further interaction.
By default, the Parallel Analyzer View does not open a gdiff window. To open a gdiff window that shows the requested changes to the source file before compiling the modified code, toggle the checkbox in Update -> Run gdiff After Update (Figure 2-19).
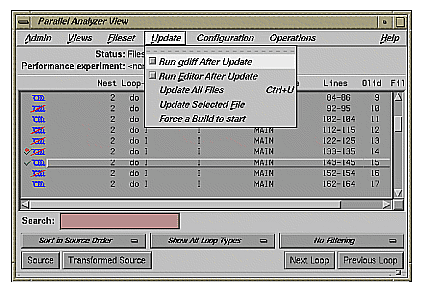
If you always wish to see the gdiff window, you can set the resource in your .Xdefaults file:
cvpav*gDiff: True |
After running the sedscript, to make additional changes before compiling the modified code, open an editor by toggling the Update -> Run Editor After Update checkbox. An xwsh window with vi running in it opens with the source code ready to be edited.
If you always prefer to run the editor, you can set the resource in your .Xdefaults file:
cvpav*runUserEdit: True |
If you prefer a different window shell or a different editor, you can modify the resource in your .Xdefaults file and change from xwsh or vi as you prefer. The following is the default command in the .Xdefault, which you can edit for your preference:
cvpav*userEdit: xwsh -e vi %s +%d |
In the above command, the +%d tells vi at what line to position itself in the file and is replaced with 1 by default. (You can omit the +%d parameter if you wish.) The edited file's name either replaces any explicit %s, or if the %s is omitted, its filename is appended to the command.
Choose Update -> Update All Files to update the source file to include the changes requested in this tutorial. (See .) Alternatively, you can use the keyboard shortcut for this operation, Ctrl+U, with the cursor anywhere in the main view.
If you have set the checkbox and opened the gdiff window or an editor, examine the changes or edit the file as you wish. When you exit these tools, the Parallel Analyzer View spawns the WorkShop Build Manager (Figure 2-20).
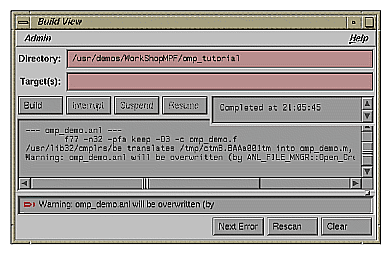
| Note: If you edited any files, verify when the Build Manager comes up that the directory shown is the directory in which you are running the sample session; if not, change it. |
Click the Build button in the Build Manager window, and the Build Manager reprocesses the changed file.
When the build completes, the Parallel Analyzer View updates to reflect the changes that were made. You can now examine the new version of the file to see the effect of the requested changes.
Scroll to Olid 14 to see the effect of the assertion request made in “Adding New Assertions or Directives With the Operations Menu”. Notice the icon indicating that loop Olid 14, which previously was unparallelizable because of the call to RTC(), is now parallel.
Double-click the line and note the new loop information. The source code also has the assertion that was added.
Move to the next loop by clicking the Next Loop button.
Note that the assertion in loop Olid 15 is gone, as requested in “Deleting Assertions or Directives”, and that the loop no longer runs in parallel. Recall that the loop previously had the assertion that foo() was not an obstacle to parallelization.
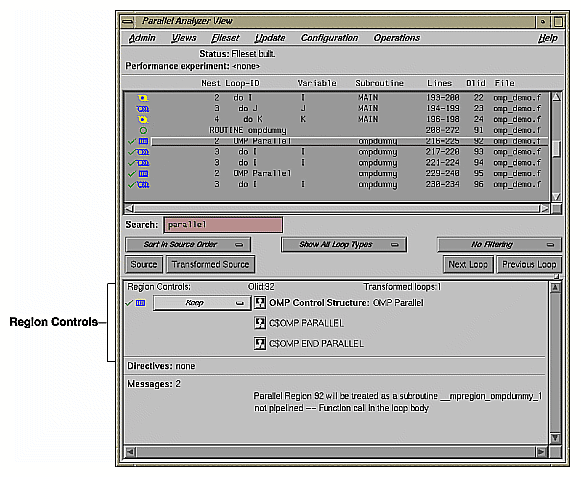
This section examines the subroutine ompdummy(), which contains four parallel regions and a serial section that illustrate the use of OpenMP directives:
For more information on OpenMP directives, see your compiler documentation or the OpenMP Architecture Review Board Web site: http://www.openmp.org.
Go to the first parallel region of ompdummy() by scrolling down the loop list, or using the Search field and entering parallel.
To select the first parallel region, double-click the highlighted line in the loop list, Olid 72.
The first construct in subroutine ompdummy() is a parallel region containing two loops that are explicitly parallelized with C$OMP DO directives. With this construct in place, the loops can execute in parallel, that is, the second loop can start before all iterations of the first complete.
Example 2-18. Explicitly Parallelized Loop Using C$OMP DO
C$OMP PARALLEL SHARED(a,b)
C$OMP DO SCHEDULE(DYNAMIC, 10-2*2)
        DO 6001 I=-100,100
           A(I) = I
6001   CONTINUE
C$OMP DO SCHEDULE(STATIC)
        DO 6002 I=-100,100
           B(I) = 3 * A(I)
6002   CONTINUE
C$OMP END PARALLEL |
Notice in Figure 2-21, that the controls in the loop information display are now labelled Region Controls. The controls now affect the entire region. The Keep option button and the highlight buttons function the same way they do in the Loop Parallelization Controls.
Click Next Loop twice to step through the two loops. Notice in the Source View that both loops contain a C$OMP DO directive.
Click Next Loop to step to the second parallel region.
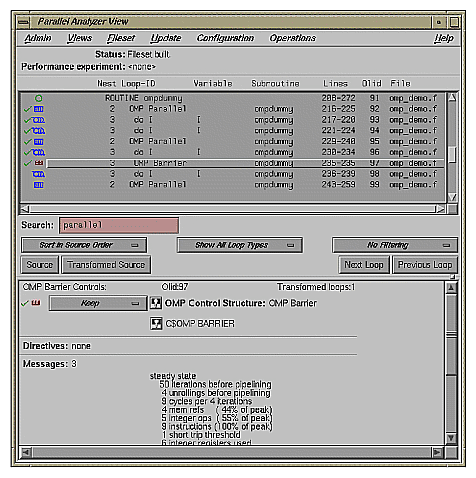
The second parallel region, Olid 75, contains a pair of loops that are identical to the previous example except for a barrier between them. Because of the barrier, all iterations of the first C$OMP DO loop must complete before any iteration of the second loop can begin.
Example 2-19. Loops Using C$OMP BARRIER
C$OMP PARALLEL SHARED(A,B)
C$OMP DO SCHEDULE(STATIC, 10-2*2)
        DO 6003 I=-100,100
           A(I) = I
6003   CONTINUE
C$OMP END DO NOWAIT
C$OMP BARRIER
C$OMP DO SCHEDULE(STATIC)
        DO 6004 I=-100,100
           B(I) = 3 * A(I)
6004   CONTINUE
C$OMP END PARALLEL |
Click Next Loop twice to view the barrier region. (See Figure 2-22.)
Click Next Loop twice to go to the third parallel region.
Click Next Loop to view the first of the two loops in the third parallel region. This loop contains a critical section.
Example 2-20. Critical Section Using C$OMP CRITICAL
C$OMP DO
       DO 6005 I=1,100
C$OMP CRITICAL(S3)
           S1 = S1 + I
C$OMP END CRITICAL(S3)
6005 CONTINUE |
Click Next Loop to view the critical section. The critical section uses a named locking variable (S3) to prevent simultaneous updates of S1 from multiple threads. This is a standard construct for performing a reduction.
Move to the next loop by using Next Loop.
This loop has a single-process section, which ensures that only one thread can execute the statement in the section. Highlighting in the Source View shows the begin and end directives.
Example 2-21. Single-Process Section Using C$OMP SINGLE
       DO 6006 I=1,100
C$OMP SINGLE
           S2 = S2 + I
C$OMP END SINGLE
6006 CONTINUE |
Click Next Loop to view information about the single-process section.
Move to the final parallel region in ompdummy() by clicking the Next Loop button.
The fourth and final parallel region of ompdummy() provides an example of parallel sections. In this case, there are three parallel subsections, each of which calls a function. Each function is called exactly once, by a single thread. If there are three or more threads in the program, each function may be called from a different thread. The compiler treats this directive as a single-process directive, which guarantees correct semantics.
Example 2-22. Parallel Sections Using C$OMP SECTIONS
C$OMP PARALLEL SHARED(A,C) PRIVATE(I,J)
C$OMP SECTIONS
        call boo
C$OMP SECTION
        call bar
C$OMP SECTION
        call baz
C$OMP END SECTIONS
C$OMP END PARALLEL |
Click Next Loop to view the entire C$OMP SECTIONS region.
Click Next Loop to view a C$OMP SECTION region.
Move to the next subroutine by clicking Next Loop twice.
The next series of subroutines illustrate directives that control data distribution and cache storage. The following three directives are discussed:
When you select the subroutine dst1d(), a directive is listed in the loop information display that is global to the subroutine. The directive, C$SGI DISTRIBUTE, specifies placement of array members in distributed, shared memory. (See Figure 2-23.)
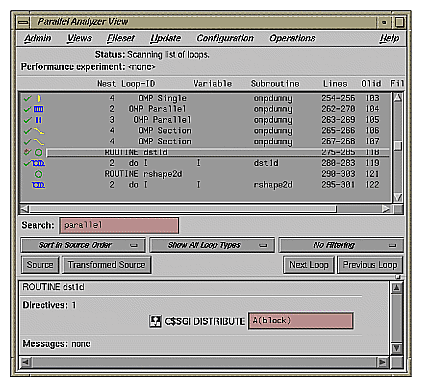
In the editable text field adjacent to the directive name is the argument for the directive, which in this case distributes the one-dimensional array a(m) among the local memories of the available processors. To highlight the directive in the Source View, click the highlight button.
Click Next Loop to move to the parallel loop.
The loop has a C$OMP PARALLEL DO directive, which works with C$SGI DISTRIBUTE to ensure that each processor manipulates locally stored data.
Example 2-23. Distributed Array Using C$SGI DISTRIBUTE
        subroutine dst1d(a)

        parameter (m=10)
        real a(m)
C$DISTRIBUTE a(BLOCK)
C$OMP PARALLEL DO
        do i=1,m
          a(i)= i
        end do

return |
You can highlight the C$OMP PARALLEL DO directive in the Source View with either of the highlight buttons in the loop information display. If you use the highlight button in the Loop Parallelization Controls, the Parallelization Control View presents more information about the directive and allows you to change the C$OMP PARALLEL DO clauses. In this example, it confirms what you see in the code: that the index variable i is local.
Click Next Loop again to view the next subroutine.
When you select the subroutine rshape2d(), the subroutine's global directive is listed in the loop information display. The directive, C$SGI DISTRIBUTE_RESHAPE, also specifies placement of array members in distributed, shared memory. It differs from the directive C$SGI DISTRIBUTE in that it causes the compiler to reorganize the layout of the array in memory to guarantee the desired distribution. Furthermore, the unit of memory allocation is not necessarily a page.
In the text field adjacent to the directive name is the argument for the directive, which in this case distributes the columns of the two-dimensional array b(m,m) among the local memories of the available processors. To highlight the directive in the Source View, click the highlight button.
Click the Next Loop button to move to the parallel loop.
The loop has a C$OMP PARALLEL DO directive (Example 2-24), which works with C$SGI DISTRIBUTE_RESHAPE so that each processor manipulates locally stored data.
Example 2-24. Distributed and Reshaped Array Using C$SGI DISTRIBUTE_RESHAPE
        subroutine rshape2d(b)
        parameter (m=10)
        real b(m,m)

C$DISTRIBUTE_RESHAPE b(*,BLOCK)
C$OMP PARALLEL DO
C$SGI&NEST (i,j)
        do i=1,m
           do j=1,m
              b(i,j)= i*j
           end do
        end do
return |
If you use the highlight button in the Loop Parallelization Controls, the Parallelization Control View presents more information. In this example, it confirms what you see in the code: that the index variable i is local, and that the nested loop can be run in parallel.
If the code had not had the C$SGI&NEST clause, you could have inserted it by supplying the arguments in the text field in the Parallelization Control View. You can use the C$SGI&NEST clause to parallelize nested loops only when both loops are fully parallel and there is no code between either the do-i and do-j statements or the enddo-i and enddo-j statements.
Click Next Loop to move to the nested loop. Notice that this loop has an icon in the loop list and in the loop information display indicating that it runs in parallel.
Click Next Loop to view the next subroutine, prfetch().
Click Next Loop to go to the first loop in prfetch(). The compiler switched the order of execution of the nested loops, Olid 128 and 129. To see this, look at the Transformed Source view.
Example 2-25. Prefetching Data From Cache Using C*$* PREFETCH_REF
      subroutine prfetch(a, b, n)

      integer*4 a(n, n), b(n, n)
      integer i, j, n

      do i=1, n
         do j=1, n
C*$*PREFETCH_REF = b(i,j), STRIDE=2,2 LEVEL=1,2 KIND=rd, SIZE=4
              a(i,j) = b(i,j)
           end do
end do |
Click Next Loop to move to the nested loop. The list of directives in the loop information display shows C*$* PREFETCH_REF with a highlight button to locate the directive in the Source View. The directive allows you to place appropriate portions of the array in cache.
This completes the first sample session.
Quit the Parallel Analyzer View by choosing Admin -> Exit.
Not all windows opened during the session close when you quit the Parallel Analyzer View. In particular, the Source View remains open because all the tools interoperate, and other tools may share the Source View window. You must close the Source View independently.
To clean up the directory, so that the session can be rerun, enter the following in your shell window to remove all of the generated files:
% make clean |